Pages

Showing posts with label DIY. Show all posts

Sunday, 11 March 2012

DYI: Glass Cleaner


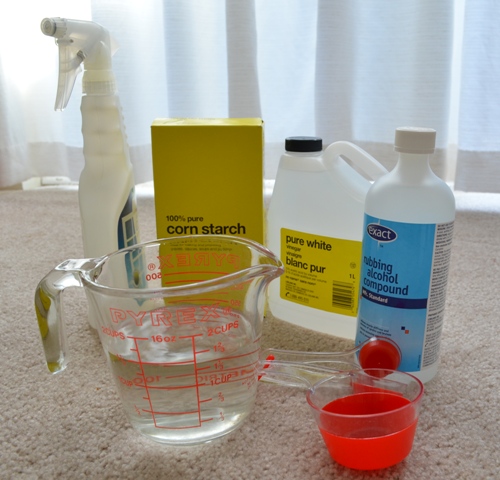
There are many reasons to start making your own household cleaning products, be it environmental reasons, financial reasons....really any reason. Although, no matter what the reason may be, we all still want products that work well. I think I have it, this might possibly be the best homemade glass cleaner ever. This recipe comes straight from Crunchy Betty, all I did was alter the measurements a teeny bit to fit in my spray bottle. Try it, it works great!

Ingredients:
1/5 cup vinegar
1/5 cup rubbing alcohol
1 tbsp cornstarch
1 1/2 cups warm water 

Direction:
Pour all the ingredients into a spray bottle and shake well. Voila, homemade glass cleaner.

Wednesday, 29 February 2012

Decorating a Cash Box


This cash box above doesn't look very pretty does it? I think the only thing I find attractive about it is the money inside. Well recently I picked up one of these old boring cash boxes at a thrift store for $3.00. I wish I would have taken a before picture, because the thing was not only boring to look at but mine seemed like it was uglier than the average cash box. 


After a few moments of thought the solution came to me, I decided I was going to spay paint a stencil pattern on it. I've never spray painted anything in my life and thought it would be easy enough. I didn't sand the box down before hand, which wasn't a terrible mistake, but would have made things a lot easier had I done so. Patches of gray kept creeping through and every time the paint dried I had to do touch up after touch up, I'm pretty sure this box has about five coats of paint on it. 


While going through the whole spray painting process I had pretty much thought that I had ruined the box, and couldn't wait for it to dry so I could assess the damage. However, after all was said and done, it just so happens that I'm pretty happy with how it turned out. It's not prefect, but I think it's pretty funky. I might just do this again if I ever come across another boring gray cash box. 


Wednesday, 22 February 2012

Decorating Light Switch/ Electrical Outlet Coverings

The standard light switch and electrical plate covers that come with every rental suite are always a boring and drab beige. I've been wanting to liven up our bedroom for a while, but didn't want to spend a whole lot of money on doing so. This idea came to me from Pinspire, it's easy to do and I'm very happy with the results, little touches sometimes make the biggest impact. 


I chose a lovely damask purple, that goes well with our solid purple bedding.


For this project you will need:
- Light switch / electrical plates
- Scissors
- Box cutter
- Acid free adhesive
- A sponge brush
- Mod Podge
- Scrapbook paper


- Take your electrical cover place it on the scrapbook paper, trace the area and cut it out. It's OK it you've cut more than you need, you can cut any excess off later.
- Use the sponge brush and paint the acid free glue onto the electrical cover as well as the paper. Place the paper over the cover and gently smooth out with your fingers. Now let it dry.
- Once everything is set cut any excess paper and cover decorated plate with mod podge, add as any coats as you want, I recommend 4-6. Let dry.
- Now that the mod podge is dried, take your box cutter and cut out all the holes.
- There you have it, some beautiful covers to replace those boring ones!